
Assess Your Needs and Goals
Before beginning any project, identify the primary purpose of your landscape lighting. Ask yourself:
– Do you want to highlight architectural features?
– Are you looking to improve safety around pathways or stairs?
– Would you like to create a specific mood or ambiance in your outdoor living spaces?
Clearly defining these goals will help guide the design process.
Understand Your Outdoor Space
Walk through your outdoor area during the day and evening to evaluate its layout and natural features. Consider:
– Focal points, such as trees, sculptures, fountains, or walls.
– Areas requiring illumination for safety, such as pathways, staircases, or driveways.
– Spaces where you gather with family or guests, like patios or decks.
Take note of shadows at night and how light can enhance certain areas while avoiding overly bright or harsh illumination.
Types of Landscape Lighting Techniques
There are multiple techniques that can be incorporated into a design:
1. Uplighting – Placing lights at ground level and directing them upwards to highlight trees or architectural features. 2. Downlighting – Mounting lights higher up (e.g., in trees) for soft illumination below. 3. Grazing – Positioning lights close to textured surfaces (like stone walls) for dramatic effects. 4. Silhouetting – Backlighting an object to emphasize its shape without detail. 5. Path Lighting – Low fixtures strategically placed along walkways for safe navigation.
Each technique serves a different purpose and can be combined for layered lighting effects.
Choosing Fixtures Based on Functionality
Different fixtures are suited for various needs:
| Fixture Type | Best For | Example Locations |
|——————|——————————-|—————————|
| Spotlights | Highlighting focal points | Trees, statues |
| Well Lights | Ground-level accent | Shrubs, flower beds |
| Bollard Lights | Pathway lighting | Walkways, driveways |
| String Lights | Ambiance | Pergolas, patios |
Selecting durable fixtures designed specifically for outdoor use ensures longevity even in harsh weather conditions.
Planning with Energy Efficiency in Mind
Opting for energy-efficient solutions like LED bulbs can save on electricity costs while reducing environmental impact. LEDs also offer longer lifespans compared to traditional incandescent bulbs.
Design Tips
Keep the long-term maintenance of your lighting system in mind:
– Use timers or smart controls for automated operation.
– Group lights into zones based on functionality (e.g., pathway zone vs entertainment zone).
– Avoid over-lighting by focusing only on key areas and objects.
Carefully thought-out planning allows you to create an elegant balance between functionality and beauty through strategic landscape lighting design.
Enhance Your Property with a Milton MA Landscaping Company’s Strategic Landscape Lighting
Strategic landscape lighting plays a crucial role in accentuating architectural features, transforming your property into a beautifully illuminated space during nighttime. It enhances the aesthetic appeal while increasing safety and functionality. Below, we delve into how to effectively highlight architectural elements using landscape lighting.
Benefits of Highlighting Architectural Features
- Enhanced Appearance: Properly illuminated features like columns, arches, and facades create a visually striking effect that elevates the overall charm of your property.
- Increased Property Value: A thoughtfully designed lighting plan enhances curb appeal, which can potentially increase your property’s market value.
- Effective Use of Space: By highlighting key structures, you add depth and dimension to your outdoor area at night.
- Improved Security: Brightening shadowy areas around doors and windows deters intruders while ensuring safe navigation.
Key Architectural Features to Illuminate
- Walls and Facades: Use wash lights to evenly illuminate the exterior walls of your home or building. This creates a warm glow that showcases textures or materials like stone or brickwork.
- Columns and Pillars: Uplighting around these structural elements adds an imposing yet elegant effect.
- Arches and Entryways: Draw attention to doorways or archways by placing spotlights at strategic angles.
- Windows and Shutters: Installing backlighting behind decorative shutters or window frames produces a soft halo-like effect.
- Rooflines or Eaves: Highlight unique roof angles using grazing techniques for subtle illumination.
Techniques for Strategic Placement
- Uplighting: Place fixtures at ground level aimed upward to highlight tall structures like walls, columns, or trees near buildings.
- Grazing: Position lights close to textured surfaces (brick or stone) so shadows enhance material patterns.
- Silhouetting: Light objects from behind to create dramatic outlines against walls or other flat surfaces.
- Shadowing: Cast shadows of plants or decorative objects onto exterior walls for added interest.
- Downlighting: Install fixtures above eye level (e.g., under eaves) to create soft pools of light below.
Types of Fixtures Ideal for Architectural Lighting
| Fixture Type | Best Used For |
| Spotlights | Focusing on specific features like statues |
| Wall Wash Lights | Evenly illuminating large vertical surfaces |
| Floodlights | Broad coverage for expansive facade areas |
| Recessed Lights | Subtle effects under eaves or stair treads |
Practical Tips for Success
- Choose warm white light (2700K–3000K color temperature) for a relaxing ambiance that complements most materials like wood, stone, and metal.
- Avoid over-lighting; subtlety is key when accentuating details without overwhelming the overall design.
- Use energy-efficient LED fixtures that are long-lasting and eco-friendly.
- Experiment with beam angles to find the perfect balance between brightness and coverage.
Strategically illuminating architectural features will not only enhance your property’s nighttime appeal but also create an inviting atmosphere suitable for any occasion—all while blending seamlessly with your landscaping efforts.
Milton MA landscapers illuminate trees and plants for a stunning outdoor aesthetic
Landscape lighting can transform your outdoor space into a visually stunning environment, especially when used to highlight trees and plants. Properly illuminating these natural features not only enhances the aesthetic appeal but also creates depth, dimension, and an inviting ambiance in your landscape design. Below, we explore effective strategies and techniques to illuminate trees and plants in your yard for maximum impact.
Benefits of Illuminating Trees and Plants
- Showcasing Natural Beauty: Lighting draws attention to the intricate details of trees, shrubs, flowers, and foliage.
- Creating Depth: Strategic lighting adds dimension to your yard by differentiating between foreground, mid-ground, and background elements.
- Enhancing Evening Ambiance: By highlighting greenery after dark, you create a warm and welcoming atmosphere.
- Boosting Property Value: A well-lit landscape increases curb appeal by giving your property an attractive nighttime aesthetic.
Techniques for Highlighting Trees
- Uplighting is one of the most popular techniques for tree lighting.
- Place lights at ground level angled upward to emphasize the trunk or canopy of a tree.
- Ideal for tall or sculptural trees like oaks or palms.
- Mimics natural moonlight filtering through branches.
- Mount lights higher up in the tree, aiming them downward at different angles for soft shadows on the ground.
- Position lights close to textured bark surfaces to highlight their unique patterns using soft light.
- Place a light source behind the tree, creating dramatic outlines while keeping the front darkened.
- Works best with sparse or uniquely shaped trees such as Japanese maples or ornamental varieties.
Strategies for Illuminating Plants
- Use small accent lights with lower lumen output to softly highlight bushes or flower beds without overpowering their natural colors.
- Implement color-changing LED options for seasonal flowers or events.
- Combine spotlights with path lighting to guide attention naturally toward lush garden areas.
Plant Lighting Table Example:
| Plant Type | Ideal Lighting Method | Recommended Bulb Color Temperature |
| Flower Beds | Accent Lighting | 2700K (Warm White) |
| Shrubs | Low Voltage Spotlights | 3000K (Soft White) |
| Ornamental Grasses | Pathway Lights | 2700K – 3000K |
Choosing Lighting Fixtures
- Opt for weatherproof materials such as stainless steel or brass that can withstand outdoor conditions.
- Consider LED fixtures due to their energy efficiency and durability; they also produce less heat which is safer near foliage.
Placement Tips
- Avoid placing too many lights in one area; focus on key features instead of overwhelming the space with excessive brightness.
- Play with angles—experiment with positioning fixtures until you achieve desired shadow effects on leaves or bark textures.
- Use dimmers or adjustable beam spreads when versatility is needed; this allows customization based on seasonality or mood preferences.
A well-thought-out lighting design can make all the difference in showcasing your landscaping efforts even after sundown. By strategically illuminating trees and plants, you create an outdoor space that feels both elegant and functional year-round.
Milton MA lawn care tips and techniques for perfect landscape lighting placement
Properly installing landscape lighting is key to achieving a professional aesthetic while ensuring functionality and safety. A thoughtful approach with the right techniques can transform an outdoor space into an inviting and visually captivating environment. Below are tips and techniques to guide you in placing your landscape lighting effectively.
Plan Before You Begin
Before jumping into installation, take the time to design a comprehensive lighting plan. This includes:
– Identifying focal points such as architectural features, trees, or pathways.
– Determining the purpose of each light—whether it’s for safety, ambiance, or highlighting specific elements.
– Sketching a map of your outdoor area and marking planned light placements.
Proper planning ensures no area is overlooked and minimizes unnecessary adjustments during installation.
Select the Right Fixtures
Choosing suitable light fixtures is just as important as their placement. Consider the following types:
– Spotlights: Ideal for highlighting trees, statues, or architectural elements.
– Pathway Lights: Perfect for illuminating walkways or garden paths while adding safety.
– Wall Washers: Used to softly illuminate walls or fences without creating harsh shadows.
Ensure that fixtures are weatherproof and designed for outdoor use to withstand various weather conditions.
Focus on Layered Lighting
Layered lighting incorporates multiple types of lights for depth and dimension in your design:
1. Ambient Lighting: Provides general illumination across spaces like patios or decks.
2. Task Lighting: Focuses on functional areas like seating zones or outdoor kitchens. 3. Accent Lighting: Highlights specific features such as water fountains or flowerbeds.
Layering creates balance while avoiding overly bright or underwhelming areas.
Pay Attention to Placement Techniques
| Area | Technique | Recommended Fixtures |
| Pathways | Space lights evenly along both sides of paths; avoid glare by angling lights downward | Pathway Lights |
| Trees | Place uplights at the base angled toward branches; experiment with distance | Spotlights |
| Facades | Use grazing technique by positioning lights close to walls; direct beams upwards | Wall Washers/Spotlights |
| Water Features | Submerge waterproof lights slightly below water level | Submersible LED Lights |
Manage Wires Properly
Outdoor wires should remain hidden yet accessible for maintenance:
– Bury wires at least 6 inches deep using conduit tubes for protection against damage from tools or wildlife. – Avoid crossing walkways to prevent tripping hazards. – Use waterproof connectors to prevent electrical issues caused by moisture exposure.
Test Before Finalizing
Before securing all fixtures permanently, test the setup at night: – Verify that key features are adequately illuminated. – Adjust angles if necessary to eliminate glare. – Ensure brightness levels align with the intended ambiance.
Testing allows you to make adjustments early, saving time later.
By following these tips and techniques during installation, you’ll achieve a beautifully illuminated outdoor area that combines style with practicality while complementing your landscaping design effortlessly.
Landscape Lighting Installation Tips and Techniques for Perfect Placement
Proper installation of landscape lighting is crucial to achieving both aesthetic appeal and functional benefits. By following proven tips and techniques, homeowners and professionals alike can create a well-lit outdoor space that enhances the property’s beauty while ensuring safety and durability.
Evaluate Your Lighting Needs
- Purpose: Decide whether the primary goal is to improve visibility, highlight architectural features, or enhance landscaping aesthetics.
- Zones: Break down your yard into zones such as pathways, garden beds, patios, or water features. Each zone may require different lighting solutions.
- Safety Concerns: Identify areas prone to darkness or potential hazards where lighting is essential for navigation.
Select Appropriate Lighting Fixtures
| Fixture Type | Best Used For | Example Features |
| Pathway Lights | Illuminating walkways | Low profile; soft light |
| Spotlights | Highlighting trees or statues | Adjustable angles |
| Floodlights | Covering large areas | Bright; wide beam spread |
| Well Lights | Subtle ground-level lighting | Recessed; unobtrusive |
| Step Lights | Illuminating stairs | Compact; directional |
Choose durable fixtures with weather-resistant materials like stainless steel or brass for longevity.
Plan Placement Strategically
- Avoid Overlighting: Excessive lighting can cause glare and detract from the natural ambiance of your outdoors.
- Focus on Key Features: Use uplighting to accentuate trees or downlighting for a soft moonlit effect on pathways.
- Spacing Matters: Place lights 6-8 feet apart along walkways for even illumination without overwhelming brightness.
- Angle Carefully: Position spotlights at an angle that enhances focal points without creating harsh shadows.
Wiring and Power Considerations
- Use low-voltage systems (12V) for energy efficiency and easier installation.
- Incorporate a transformer that matches your total wattage needs.
- Bury wires at least 6 inches deep to avoid damage from gardening activities or foot traffic.
- Test all connections before finalizing placements to prevent future troubleshooting issues.
Test at Night
- Realign misdirected fixtures causing glare or shadows in unintended areas.
- Adjust brightness levels if certain zones appear too dim or overly intense.
- Ensure all safety-critical areas—such as steps, driveways, and walkways—are adequately illuminated.
Maintenance After Installation
- Clean lenses regularly to avoid dirt buildup reducing light output.
- Check wiring connections annually for signs of wear or corrosion.
- Replace burnt-out bulbs promptly with compatible types.
By applying these tips and techniques during installation, you’ll achieve a balanced and visually appealing outdoor lighting design that elevates both functionality and style.
Transform Your Yard with Expert Landscaping Milton MA Services
Creating a well-lit outdoor living space not only enhances the aesthetic appeal of your property but also promotes functionality and safety. Thoughtfully designed landscape lighting can transform your backyard, patio, or garden into a welcoming and visually stunning retreat for evenings and night-time gatherings. Below are some ideas to help you design an inviting outdoor space using beautiful and effective lighting techniques.
Benefits of Outdoor Living Space Lighting
Adding lighting to your outdoor living areas offers numerous advantages, including: – Extended Usability: Enjoy your patio, deck, or garden long after sunset. – Improved Ambiance: Create a cozy and intimate atmosphere for family gatherings or entertaining guests. – Increased Safety: Reduce the risk of trips and falls by illuminating stairs, walkways, and other potential hazards. – Enhanced Property Value: Professionally designed lighting can boost curb appeal and add to your home’s resale value.
1. String Lights for a Relaxed Vibe
String lights are an easy way to add charm to any outdoor setting. Use them to: – Drape across pergolas or gazebos for soft overhead lighting. – Wrap around tree trunks or posts for a whimsical touch. – Hang above seating areas for a warm glow that encourages relaxation.
2. Recessed Deck Lights
If you have a deck or patio, recessed lights are perfect for subtle yet effective illumination. Benefits of recessed deck lights include: – Seamless integration into flooring without obstructing movement. – Highlighting the edges of the deck to ensure visibility after dark.
| Feature | Benefit |
| Flush installation | Prevents tripping hazards |
| Downward-facing light | Reduces glare |
3. Wall Wash Lighting
Wall wash lighting involves placing fixtures close to vertical surfaces like walls or fences at an upward angle. This technique: – Adds depth by highlighting textures like stonework or wood grain. – Creates soft ambient light without harsh brightness.
4. Fire Features with Integrated Lighting
Enhance fire pits and fireplaces by incorporating LED strips around their base or beneath surrounding benches. This combination fosters warmth while offering gentle illumination.
Tips for Choosing Fixtures
When selecting fixtures for outdoor living spaces: 1. Opt for weather-resistant materials like stainless steel, brass, or copper to withstand exposure to the elements. 2. Choose fixtures with adjustable brightness levels so you can customize lighting based on the occasion. 3. Use energy-efficient options such as LED lights that offer long lifespans and reduced electricity costs.
Layering Light in Outdoor Areas
Layering different types of light sources is essential when designing an inviting atmosphere outdoors: 1. Ambient Lighting: Provides overall illumination (e.g., string lights). 2. Task Lighting: Focuses on specific areas (e.g., grilling stations or dining tables). 3. Accent Lighting: Highlights key features (e.g., architectural details, plants).
Creative Placement Ideas
To maximize both aesthetics and functionality: – Position uplights at the base of trees to emphasize their height and natural beauty. – Install path lights along walkways leading from patios to gardens for clear navigation at night. – Place small spotlights in flowerbeds to showcase vibrant blooms after sunset.
Beautifully designed landscape lighting transforms ordinary outdoor spaces into extraordinary ones that invite relaxation, connection, and enjoyment under the stars year-round—no matter your style preference or budget constraints!
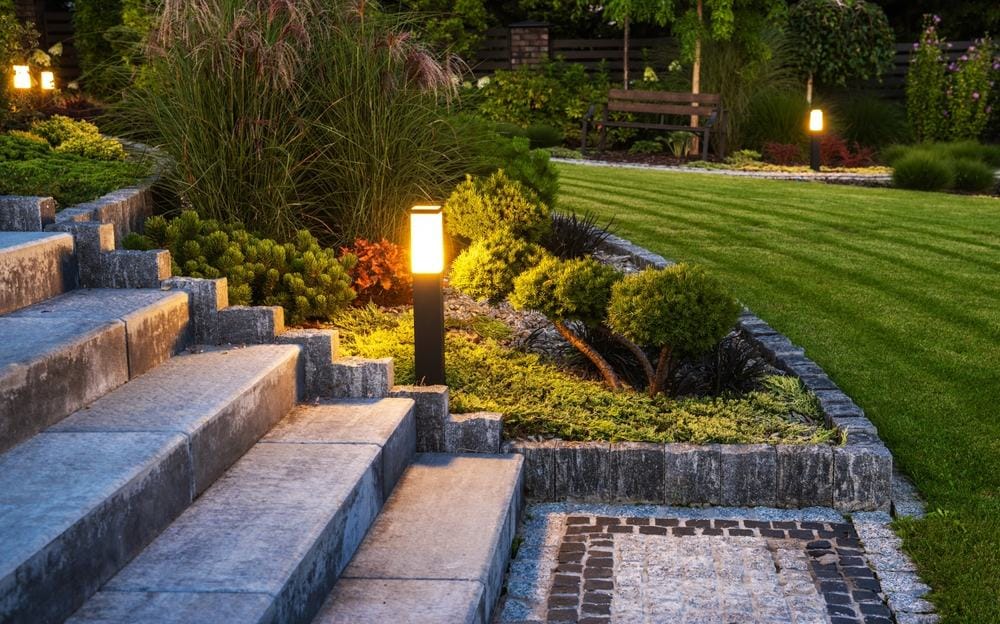
Illuminating Pathways and Driveways to Combine Safety and Style
Landscape lighting for pathways and driveways serves two critical purposes: enhancing safety and adding visual appeal to your property. A well-illuminated exterior not only ensures that walkways are safe to navigate after dark but also creates a welcoming atmosphere for guests while boosting curb appeal. Below, we discuss key considerations, ideas, and techniques for designing effective pathway and driveway lighting.
Benefits of Pathway and Driveway Lighting
- Improved Safety: Reduces the risk of trips, slips, or falls in low-light conditions.
- Enhanced Security: Brightly lit paths deter potential intruders by eliminating hiding spots.
- Aesthetics: Creates a polished, elegant look that enhances the overall design of your outdoor space.
- Increased Property Value: Adds sophistication that contributes to higher resale value.
Types of Pathway and Driveway Lights
- Small fixtures placed along pathways or garden edges.
- Offer soft illumination to guide visitors.
- Typically available in solar-powered or hardwired options.
- Taller fixtures ideal for lining larger driveways or expansive landscapes.
- Provide brighter light coverage compared to path lights while maintaining a sleek appearance.
- Installed directly into the ground along walkways or driveways.
- Offer a modern design with minimal visual obstruction during daylight hours.
- Activated by movement for added security.
- Energy-efficient option as they illuminate only when needed.
- Suitable for under-step illumination along walkways or edge lighting for driveways.
- Highly versatile with customizable lengths and colors.
Placement Tips for Effective Illumination
- Space fixtures evenly to avoid overly bright areas or shadows.
- Place lights low to the ground (12–24 inches) to ensure even coverage without glare.
- Alternate light placement on either side of the path for an inviting visual effect.
- Use recessed lights or edge-mounted fixtures on narrow paths where space is limited.
| Light Type | Ideal Use Case | Pros | Cons |
| Path Lights | Residential gardens, small paths | Easy installation, affordable | Limited brightness |
| Bollard Lights | Long driveways | High visibility, decorative | Requires more space |
| Recessed In-Ground | Modern homes | Minimalistic look | Complex installation |
| Motion Sensors | Security applications | Energy-efficient | May activate unnecessarily |
| LED Strips | Steps/edges | Customizable colors/designs | May require frequent cleaning |
Styling Tips for Combining Safety with Elegance
Beyond functionality, pathway and driveway lighting can enhance your property’s aesthetics by incorporating stylish features.
- Opt for warm white bulbs (2700K) to create a cozy ambiance rather than harsh light tones.
- Choose fixtures that complement your landscape’s architectural style—modern homes may benefit from sleek metal designs, while traditional properties might suit lantern-style lights.
- Integrate plants near bollard lights or path lights; the interplay of shadow adds texture to outdoor visuals at night.
Carefully selected lighting design can seamlessly combine safety with an attractive aesthetic appeal while boosting nighttime usability throughout your landscape.
- Expert Tips for Choosing the Perfect Milton MA Landscapers for Your Home
- 5 Simple Tips for Choosing the Perfect Milton MA Landscaping Company for Your Home
- Everything You Need to Know about Planning a Landscape Lighting Design
- Key Qualities to Look For When Choosing a Milton MA Lawn Care Professional
- 9 Compelling Reasons to Hire Milton MA Landscapers for Your Outdoor Needs
- When to Hire Milton MA Landscapers for Your Next Project